Building a Remote Administration App

[ .NET, PHP, WinForms ]

As the world becomes more interconnected and reliant on technology, the need for remote administration tools has increased. A remote administration app allows system administrators to manage multiple computers simultaneously without having to physically access them. In this article, we’ll discuss the architecture of a remote administration app that supports managing multiple computers through command lists. It’s one of my past projects that I built around 2011.

The app is built using VB.NET for the client-side and PHP for the web part. The client-side app runs on the computers that the administrator wants to manage, while the web part runs on the administrator’s computer. The client-side app runs passively in the background and listens for commands from the web part. The app uses a command list to manage the computers. The command list is a plain text file that contains a list of commands that the client-side app should execute. The commands can be used to update files, download files, create or delete files, and rename files. The client-side app reads the command list and executes the commands one by one. The client-side app also sends back the output of the executed commands to the web part. The web part then displays the output to the administrator. This allows the administrator to see the results of the commands and make decisions based on the output. The app is designed to be flexible and customizable. The administrator can create custom command lists for specific tasks. For example, a command list can be created to update software on multiple computers at once. The administrator can also add new commands to the app to extend its functionality.

One of the key features of the app is its ability to manage multiple computers simultaneously. The administrator can create a command list that targets multiple computers, and the app will execute the commands on all of them. This saves the administrator time and effort by allowing them to manage multiple computers at once. The app also supports error handling and logging. If a command fails to execute on a computer, the app will log the error and continue with the rest of the command list. This allows the administrator to identify and fix errors quickly.

In conclusion, a remote administration app is a powerful tool for system administrators who need to manage multiple computers simultaneously. The app we’ve discussed in this article is designed to be flexible, customizable, and easy to use. By using a command list, the app allows administrators to execute complex tasks on multiple computers with ease. With its error handling and logging capabilities, the app is also designed to be reliable and robust.

DVay – a video hosting assistant

[ .NET, WinForms, HTTP ]

About 15 years ago, during my time as a university student and freelancer, I was given the responsibility to build a windows client for a popular video tube platform.

The resulting app was designed to provide users with an optimal viewing experience, complete with features that catered to their every need.

The app’s search function was one of its most critical components, as it allowed users to find videos quickly and easily. By entering a search term, users could get relevant results that included video titles, thumbnails, and other essential details.

To make searching even more efficient, the app included filters that allowed users to narrow down their search by video length, upload date, and category.

Once a user found a video they wanted to watch, they could do so within the app’s fast and responsive video player. This feature also gave users the ability to adjust video quality to suit their internet speed. Additionally, users could leave comments and ratings on the videos, helping others make informed decisions on which videos to watch.

Perhaps one of the app’s most popular features was the ability to download videos for offline viewing. This feature was especially useful for users with limited internet access, ensuring they could enjoy their favorite videos even when they were not connected to the internet.

Unfortunately this project was proprietory and the server has long been shut down.

M3UCopy

[ .NET, Console, C#, System.IO ]

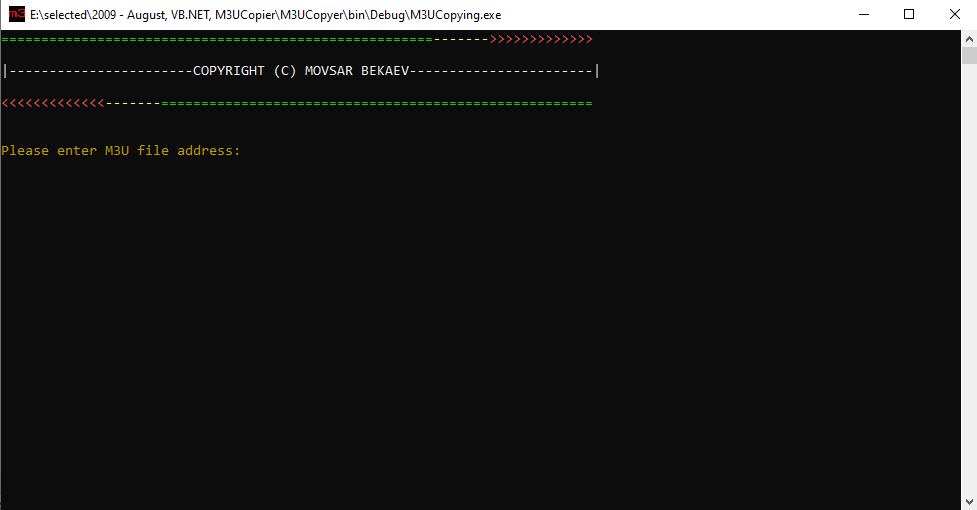
In this article, we will examine a code snippet that copies files from an M3U file to a designated folder. We will discuss its functionality, how it works, and its benefits. It’s a simple Windows Console app that I wrote when dealing with some playlists trying to organize music files on my local machine.

The code begins by checking if the arguments passed to it are less than one. If this is true, the program will prompt the user to enter the path of the M3U file and the destination folder where the files will be copied. This is done through the Console class of the System namespace.

After prompting the user for input, the code then reads the contents of the M3U file using a StreamReader class. The StreamReader class is used to read characters from a stream in a specified encoding. In this case, the encoding used is 1251. The next section of the code extracts the file names from the M3U file and adds them to a collection called fNamesCol. This is done using a while loop that reads each line of the M3U file until it reaches the end of the file. Within this loop, there is an if statement that checks if the current line is the first line of the file. If it is, it reads the line and adds it to the collection. If it is not, it skips the line.

Once the file names have been extracted, the code then checks if there are any files in the collection. If there are, it then copies each file from its source location to the destination folder. This is done using a foreach loop that iterates through each file in the collection. Within this loop, a new FileInfo object is created for each file, and the File.Copy method is called to copy the file from its source location to the destination folder. After all the files have been copied, the code then displays a message to indicate that the process is complete. The code then waits for the user to press enter before opening the destination folder using the Process.Start method.

try
{
    Console.ForegroundColor = ConsoleColor.DarkYellow;
    Console.WriteLine("Please enter the path of the M3U file:");
    Console.ForegroundColor = ConsoleColor.Yellow;
    var m3uFilePath = Console.ReadLine();

    Console.ForegroundColor = ConsoleColor.DarkYellow;
    Console.WriteLine("Please enter the path of the collection where you want to copy the files:");
    Console.ForegroundColor = ConsoleColor.Yellow;
    var collectionPath = Console.ReadLine();

    var fileNamesCollection = new List<string>();
    var i = 0;
    using (var streamReader = new StreamReader(m3uFilePath, System.Text.Encoding.GetEncoding(1251)))
    {
        streamReader.ReadLine(); // skip the first line
        while (!streamReader.EndOfStream)
        {
            if (i == 1)
            {
                var fileName = streamReader.ReadLine();
                if (fileName.Substring(1, 1) != ":")
                {
                    fileName = $"{m3uFilePath.Substring(0, 3)}{fileName}";
                }
                fileNamesCollection.Add(fileName);
                i = 0;
            }
            else
            {
                streamReader.ReadLine();
                i++;
            }
        }
    }

    if (fileNamesCollection.Count > 0)
    {
        if (!collectionPath.EndsWith("\\"))
        {
            collectionPath += "\\";
        }
        foreach (var fileName in fileNamesCollection)
        {
            var file = new FileInfo(fileName);
            Console.WriteLine(fileName);
            File.Copy(file.FullName, $"{collectionPath}{file.Name}", true);
            Console.ForegroundColor = ConsoleColor.Green;
            Console.WriteLine("OK!");
            Console.ForegroundColor = ConsoleColor.DarkYellow;
        }
        Console.ReadLine();
    }
    Console.WriteLine("Done!");
    Console.ReadLine();
    System.Diagnostics.Process.Start("explorer", collectionPath);
}
catch (FileNotFoundException)
{
    Console.ForegroundColor = ConsoleColor.Red;
    Console.WriteLine("The M3U file cannot be found!");
    System.Threading.Thread.Sleep(1000);
}
catch (Exception ex)
{
    Console.ForegroundColor = ConsoleColor.Red;
    Console.WriteLine($"An error occurred: {ex.Message}");
    System.Threading.Thread.Sleep(1000);
}

In summary, this code snippet automates the process of copying files from an M3U file to a designated folder. It achieves this by reading the contents of the M3U file, extracting the file names, and copying them to the destination folder.

Download: M3UCopying

WebPhotos – A bulk resizer

[ .NET, WinForms, Graphics ]

Image resizing is a common task in software development, especially when dealing with photos and other visual media. It can be time-consuming and cumbersome to resize a large number of images manually, which is where automated tools come in handy. In this blog post, we’ll explore an application written in VB.NET that allows the bulk resizing of images to a given size.

The application has a simple and intuitive user interface, making it easy for users to select multiple images and specify the maximum size they want the images to be. Once the user has selected the images and entered the desired size, the application resizes the images and saves them to the same directory as the original images with a “-wp” suffix added to the file name.

The code for the application uses the .NET framework’s Graphics class to resize the images. It first creates a new Bitmap object from the source image and then calculates the new width and height based on the desired size. It then creates a new Bitmap object with the new width and height and uses the Graphics class to draw the resized image onto the new Bitmap. The application uses high-quality bilinear interpolation to ensure that the resized images look as good as possible.

One important feature of the application is its ability to handle large images without consuming too much memory. It achieves this by processing the images in chunks rather than loading the entire image into memory at once. This helps prevent the application from crashing when processing large images.

Here’s the main operating block that actually does the job:

Private Sub ResizeImage(ByVal sourceFilePath As String, ByVal maxSize As Integer)
    ' Load the source image
    Dim sourceImage As New Bitmap(sourceFilePath)

    ' Determine the new dimensions of the image
    Dim widthRatio As Double = sourceImage.Width / maxSize
    Dim heightRatio As Double = sourceImage.Height / maxSize
    Dim scaleFactor As Double = Math.Max(widthRatio, heightRatio)

    Dim newWidth As Integer = CInt(Math.Round(sourceImage.Width / scaleFactor))
    Dim newHeight As Integer = CInt(Math.Round(sourceImage.Height / scaleFactor))

    ' Create a new bitmap with the new dimensions
    Dim newImage As New Bitmap(newWidth, newHeight)

    ' Resize the image
    Using g As Graphics = Graphics.FromImage(newImage)
        g.InterpolationMode = Drawing2D.InterpolationMode.HighQualityBilinear
        g.DrawImage(sourceImage, 0, 0, newWidth, newHeight)
    End Using

    ' Save the resized image
    Dim extension As String = Path.GetExtension(sourceFilePath)
    Dim newFilePath As String = Path.Combine(Path.GetDirectoryName(sourceFilePath), 
                                             Path.GetFileNameWithoutExtension(sourceFilePath) & "-resized" & extension)
    newImage.Save(newFilePath, sourceImage.RawFormat)
End Sub

  1. Loads the source image into a Bitmap object using the path of the image file.
  2. Determines the new dimensions of the image by calculating the ratios of the source image’s width and height to the maximum size, and then chooses the larger ratio as the scale factor. The new dimensions are then calculated by dividing the source image’s dimensions by the scale factor.
  3. Creates a new Bitmap object with the calculated new dimensions.
  4. Resizes the source image to fit the new dimensions of the new Bitmap object using the Graphics object of the new Bitmap object. The interpolation mode of the Graphics object is set to “HighQualityBilinear” to improve the quality of the resized image.
  5. Saves the resized image as a new file by constructing a new file path using the directory, name, and extension of the original file. The file is saved in the same format as the source image file.

Overall, this application is a great tool for anyone who needs to resize a large number of images quickly and easily. It’s a testament to the power and versatility of the .NET framework and demonstrates how simple it can be to create useful applications with just a few lines of code.

Download: PhotosToWeb

URL Hiding – A hyperlink concealer

[ .NET, WinForms, System.Text ]

In the realm of hacking, it is often necessary to conceal the true URL, preventing users from recognizing its text before clicking. One way to accomplish this is through the use of URL encoding, a process that converts a URL into a code representation that can be easily read and understood by machines, but not by humans.

URL encoding is a method that allows special characters within a URL, such as ampersands, spaces, and question marks, to be replaced with hexadecimal values, making the URL easier to process and manipulate by automated tools. By encoding URLs, hackers can evade detection and gain access to sensitive data that would otherwise be off-limits.

In the hands of a skilled hacker, this technique can be used to exploit vulnerabilities in a website’s code, steal user information, and carry out other malicious activities. As such, it is important for website owners and developers to be aware of URL encoding and take steps to protect their sites from potential attacks.

It can be used to convert URLs to code representation and back to normal. It’s quite simple and most of the work is done in this simple replacement method:

 Private Sub SymToCod()
    Dim specialChars() As Char = "-./\:;?#@'+!<>"
    Dim encodedChars() As String = {"%2D", ".", "/", "\", ":", ";", "?", "#", "@", "'", "+", "!", "<", ">"}
    Dim result As New StringBuilder("http://")

    For Each c As Char In rtbInput.Text
        If specialChars.Contains(c) Then
            result.Append(encodedChars(Array.IndexOf(specialChars, c)))
        Else
            For j = 0 To 35
                If syms(j).Contains(c) Then
                    result.Append(Microsoft.VisualBasic.Left(syms(j), 3))
                    Exit For
                End If
            Next
        End If
        progressMain.Value += 1
    Next

    rtbOutput.Text = result.ToString()
End Sub
  1. The code defines two arrays: specialChars and encodedChars. The specialChars array contains the characters that need to be replaced, while encodedChars contains the encoded versions of these characters.
  2. The input string is taken from a rtbInput control, and the resulting encoded string is stored in a new StringBuilder object called “result.”
  3. For each character in the input string, the code checks if it is a special character. If it is, the code replaces it with its corresponding encoded character from the encodedChars array. If not, it moves on to the next step.
  4. The code then checks if the character matches any of the characters in the syms array. If it does, the corresponding three-character code is appended to the result string.
  5. A progress bar called progressMain is also incremented with each character processed.
  6. Finally, the resulting encoded string is displayed in another rtbOutput control.

Overall, this code is useful for anyone who needs to encode special characters in URLs to ensure that they are transmitted correctly. I wrote this app more than a decade ago, now there are libraries for each programming language that makes it easy to use URL encoding, yet it might still be valuable for someone to peek into the details and see how it works.

Download: URLHiding

A multilingual Task Manager

[ .NET, WinForms, Globalization ]

As a software developer, creating a task manager is a common project that many undertake. Task managers are essential tools that allow users to view and manage running processes on their computers. While Windows Task Manager serves this purpose well, creating your own task manager can be a great learning experience and can help you understand how processes work in a more granular way.

This task manager was created by me back in 2005, it is essentially a reimplementation of the Windows Task Manager, as most of the early projects of all developers, it was more of a study project than something I could sell or prefer to use. This app is written in Visual Basic.NET and targets .Net Framework 2.0. The user interface of this app is very similar to that of the Windows Task Manager and displays detailed information about each running process.

One of the major benefits of creating your own task manager is that you have the freedom to customize it to your liking. For example, you can add additional features or information that may not be available in the Windows Task Manager. In my implementation, I added multilingual support, making it one of the first apps ever written with Chechen interface.

Overall, creating a task manager application can be a great project for software developers, particularly those who are interested in learning about system-level programming. By building your own task manager, you can gain a better understanding of how processes work and how to interact with them programmatically. Additionally, customizing your own task manager can provide additional features and insights that may not be available in the Windows Task Manager.

Download: MyTM

ISDB – my first project on Windows

[ .NET, ADO, OLEDB, MS Office Interop ]

As a software engineer, creating an application that helps solve a real-world problem is an impressive achievement. It takes time, dedication, and a deep understanding of programming concepts to develop an application that is not only functional but also user-friendly. This is why I am proud to share my experience of developing a computer parts store management application when I was only 14.

The application I created was designed to assist computer parts store owners in managing their inventory, making sales, and creating bulk discounts for customers. The idea came from my cousin who was opening his compuiter store at the time, I wanted to do something useful so he gave me this idea. I was so obsessed with learning programming that having no internet or programming books didn’t stop me, I had MSDN installed locally and knowing a few words in English I was able to start my journey as a developer. The application that resulted features full CRUD operations, i.e. users can add, view, edit, and delete records from the database. The data is accessed through OLEDB using an MS Access database, making it easy for users to input and manage their inventory data. I used extensively C1 components developed by ComponentOne and applied various custom visual styles through UI events.

One of the unique features of the application is its ability to make discounts and bulk sells. This is particularly useful for customers who want to assemble a PC from parts. With just a few clicks, customers can select the items they need and apply a discount to the overall price. This makes it easier for store owners to manage sales and provides a more streamlined experience for customers.

Another noteworthy feature of the application is its ability to export the database to HTML format. This allows store owners to easily share their inventory data with others or keep a backup of their data in a different format. The database is displayed as a list table on the first screen of the application, making it easy for users to view and manage their data.

Overall, the computer parts store management application I developed was a challenging but rewarding project. It allowed me to gain hands-on experience with programming concepts such as data access, CRUD operations, and user interface design. It also taught me the importance of testing and debugging, as I encountered numerous errors during the development process.

It is worth mentioning that the computer parts store management application I created was built using Visual Basic.Net and the first version of the .NET Framework (1.1). This provided me with a solid foundation for developing desktop applications and taught me valuable skills that I have continued to build upon throughout my career. Although the application was created at a young age, it was a significant accomplishment that provided me with a strong sense of accomplishment and laid the groundwork for my future development projects.

Download: ISDB v5.5.
You can download .NET Framework 1.1. required to run the app from here.