MVPS.net VPS Review: A Solid Choice for Affordable Hosting with Real Support

In the world of virtual private servers (VPS), finding the right balance between price, performance, and customer service can be a challenge. I recently decided to try MVPS.net’s VPS One tier, and after some time using the service, I can say I’m generally quite satisfied with my experience. Here’s a breakdown of what stood out to me about MVPS.net.

Affordable Pricing that Doesn’t Skimp on Features

One of the most compelling reasons I chose MVPS.net was the pricing. The VPS One tier offers incredible value, especially for those looking for an entry-level VPS solution. If you’re looking for a cost-effective way to host your projects or websites without breaking the bank, MVPS.net delivers.

Despite its low cost, you still get all the essential features you’d expect from a good VPS service, making it ideal for small businesses, personal projects, or even those who are just starting with virtual servers. It’s clear that MVPS.net focuses on affordability without sacrificing too much in terms of quality.

Support That’s Actually There for You

The standout feature for me has to be their support system. Unlike many hosting providers that rely heavily on automated bots and canned responses, MVPS.net offers real human interaction. Whenever I had a question or needed assistance, I felt like I was talking to someone who genuinely wanted to help, and that’s becoming a rare commodity in the hosting world. Whether it was technical guidance or troubleshooting, the support team was quick and helpful.

Areas for Improvement: Internet Speeds

While my overall experience with MVPS.net has been positive, there’s one area that could use some improvement – internet speeds. During my usage, I noticed that while the VPS performed well in terms of uptime and reliability, the speeds were sometimes not as fast as I would have liked.

This isn’t a dealbreaker, but if you’re running a high-demand application or need faster speeds for heavy data tasks, it’s something to keep in mind. I’m hopeful that they’ll work on optimizing this aspect, as the rest of the service is very strong.

Conclusion: A Great Choice for Value Seekers

All in all, MVPS.net’s VPS One tier is an excellent option for those who are looking for a budget-friendly VPS solution with solid customer support. The performance is reliable, and while there’s room for improvement in terms of internet speeds, the pros far outweigh the cons. If you want a VPS that gives you a lot of bang for your buck and backs it up with real, human support, MVPS.net is definitely worth considering.

Best practices with a To-Do List API

[ ASP .NET Core, EF Core, SQL Server, Docker, SOLID ]

Introduction

In this article, we will explore the process of building a To-Do List application using a RESTful API. The application showcases best practices, adheres to SOLID principles, and incorporates essential design patterns.
The code for the application can be found in the GitHub repository.

Design Patterns and SOLID

Throughout the development of the To-Do List API, adherence to the SOLID principles was a key consideration. By following SOLID, the codebase promotes maintainability and testability. Here’s how the principles were applied:

  1. Single Responsibility Principle (SRP): The code adheres to the SRP by ensuring that each class has a single responsibility. For example, the TdTask class represents a task entity and encapsulates task-related properties and behavior.
  2. Open/Closed Principle (OCP): The code follows the OCP by allowing extension of behavior without modifying existing code. This is evident in the repository pattern implementation, which separates data access logic into the TaskRepository class. Additional repositories can be added without modifying existing code.
  3. Liskov Substitution Principle (LSP): The LSP is upheld by designing the code in a way that derived classes can be substituted for their base classes. The TaskRepository implements the ITaskRepository interface, allowing different repository implementations to be used interchangeably.
  4. Interface Segregation Principle (ISP): The ISP is respected by defining fine-grained interfaces that are specific to the client’s needs. The ITaskRepository interface provides only the necessary methods for interacting with tasks, avoiding unnecessary dependencies.
  5. Dependency Inversion Principle (DIP): The DIP is implemented by utilizing dependency injection throughout the codebase. Constructor injection is used to provide dependencies to classes, promoting loose coupling and testability.

I used some other design patterns as well:

  • Repository Pattern:
    The repository pattern separates the data access logic from the application’s business logic. By implementing the ITaskRepository interface and creating the TaskRepository class, we encapsulate the data access operations for tasks, providing a clean and consistent way to interact with the underlying data store.
  • Dependency Injection (DI):
    The application leverages the concept of dependency injection to achieve loose coupling and enhance testability. The TaskController class receives an instance of the ITaskRepository interface via constructor injection. This allows for easy substitution of the repository implementation and facilitates unit testing by mocking dependencies.
  • Filter Pattern:
    The ValidationFilterAttribute class demonstrates the use of the filter pattern. By implementing the IActionFilter interface, it intercepts HTTP requests to validate the incoming data. It ensures that the task object is not null and validates the model state before executing the corresponding action method.

Endpoints and Operations

The API provides a set of well-defined endpoints that enable users to perform CRUD (Create, Read, Update, Delete) operations on tasks. Here’s an overview of the available endpoints:

  • Create a Task: [POST] /task/create
    This endpoint creates a new task and returns the newly created task ID.
  • Retrieve a Task: [GET] /task/read/{id}
    This endpoint retrieves a task specified by its ID.
  • Update a Task: [PUT] /task/update/{id}
    This endpoint updates an existing task identified by its ID.
  • Delete a Task: [DELETE] /task/delete/{id}
    This endpoint deletes a task based on its ID.
  • Mark a Task as Complete: [PATCH] /task/mark/complete/{id}
    This endpoint marks a task as completed.
  • Mark a Task as Incomplete: [PATCH] /task/mark/incomplete/{id}
    This endpoint marks a task as incomplete.
  • List all Tasks: [GET] /task/list
    This endpoint lists all tasks.
  • List Overdue Tasks: [GET] /task/list/overdue
    This endpoint lists all overdue tasks.
  • List Pending Tasks: [GET] /task/list/pending
    This endpoint lists all pending tasks.

All these endpoints have been documented with ///summary tag, which allows developers to easily navigate and test, especially using Swagger.

Code Highlights

Here are some noteworthy aspects of the code implementation:

  • The TdTask class represents a task entity with properties such as Id, Title, DueDate, and IsCompleted. It incorporates SOLID principles by encapsulating the logic for setting the completion status within the class itself.
    public class TdTask
    {
        [Key]
        [DatabaseGenerated(DatabaseGeneratedOption.Identity)]
        public Guid Id { get; private set; }
        [StringLength(200)]
        public string Title { get; set; } = String.Empty;
        public DateTime DueDate { get; set; }
        public bool IsCompleted { get; private set; }
        public void SetCompletionStatus(bool isCompleted)
        {
            IsCompleted = isCompleted;
        }
    }

  • The TaskRepository class implements the ITaskRepository interface and provides the data access methods for tasks. It utilizes Entity Framework Core and the repository pattern to interact with the underlying database.
    public class TaskRepository : ITaskRepository
    {
        private readonly DataContext _context;

        public TaskRepository(DataContext context)
        {
            _context = context;
            _context.Database.EnsureCreated();
        }

        public async Task<int> SaveChangesAsync()
        {
            return await _context.SaveChangesAsync();
        }

        public async Task<TdTask> AddAsync(TdTask tdTask)
        {
            _context.TdTasks!.Add(tdTask);
            await _context.SaveChangesAsync();
            return tdTask;
        }
        ...
    }

  • The DataContext class extends the DbContext and represents the database context for the application. It configures the connection string using values from the settings.json file.
    public class DataContext : DbContext
    {
        public DbSet<TdTask>? TdTasks { get; set; }
        public static string GetCurrentConnectionString()
        {
            var config = new ConfigurationBuilder()
                                  .AddJsonFile("settings.json", optional: false)
                                  .Build();

            return config.GetSection("ConnectionString").Value;
        }
        public DataContext(DbContextOptions options) : base(options) { }
    }

  • The TaskControllerTests class demonstrates unit tests for the TaskController class. It utilizes the Moq framework to mock the repository and verifies the behavior of the controller methods.
    public class TaskControllerTests
    {
        private readonly TaskController _taskController;
        private readonly Mock<ITaskRepository> _repository = new();
        public TaskControllerTests()
        {
            _taskController = new TaskController(_repository.Object);
        }

        [Fact]
        public async Task MarkComplete_ValidId_ReturnsOkResponse()
        {
            // Arrange          
            var testGuid = Guid.NewGuid();  
            _repository.Setup(m => m.SetCompletionStatusAsync(testGuid, true));

            // Act
            var response = await _taskController.MarkComplete(testGuid);

            // Assert
            Assert.IsType<OkResult>(response);
        }
        
        ...
    }

Testing Approach

The API includes a comprehensive set of unit tests to ensure the reliability and correctness of the code. The tests were written using the xUnit testing framework and Moq for mocking dependencies. Let’s highlight the testing approach:

  1. Each test method focuses on a specific scenario, covering different aspects of the API endpoints and their expected behavior.
  2. The Mock<T> class from Moq is utilized to create mock instances of the ITaskRepository interface. This allows for isolated testing of the controller without relying on the actual data access layer.
  3. The Arrange-Act-Assert (AAA) pattern is followed in each test method. The necessary objects and dependencies are arranged, the action under test is executed, and the assertions verify the expected outcomes.

Configuration with Docker

To ensure seamless deployment and containerization, the project is configured to run with a Docker image. The provided Dockerfile sets up the necessary environment and dependencies to host the To-Do List API. By leveraging Docker, the application can be easily deployed across different platforms and environments.

Conclusion

In this article, we explored the process of building a To-Do List API with adherence to best practices, including SOLID principles and comprehensive testing. The codebase demonstrates the implementation of design patterns such as the repository pattern and dependency injection. Additionally, Docker configuration ensures easy deployment and portability. By following these best practices, you can create robust and maintainable APIs for managing tasks efficiently.

Go ahead and clone the repository, thanks to Docker, it will just run and work (provided you have Docker installed :))

GitHub: A Simple To Do List API

DoshStat – a word frequency analyzer

[ .NET, C#, SQLite, iTextSharp ]

A few years ago I worked as a researcher in linguistics, analyzing and studying text documents was a crucial part of the job. However, the manual process of counting and studying the frequency of words in electronic documents can be a tedious and time-consuming task. To solve this problem, and with the suggestion of my supervisor, I developed this app to streamline the process. It is designed to support batch processing of various types of electronic text documents, including pdf, txt, doc, docx, odt, xlsx, htm, html, and rtf formats. It also supports a single data warehouse, making it easy to store, search and retrieve information.

One of the essential functions of the app is counting the number of characters and words in each document. This feature saves users time and energy, as it automatically generates these statistics and presents them in an easy-to-read format. Another critical function of the app is the study of the frequency and density of words in each document. This feature allows users to gain insights into the use of specific words and phrases in each document and the overall language patterns used by the author. The app also allows users to search for words according to given conditions, making it easier to study specific topics or themes in a document.

The app was developed using C#, a programming language that is widely used in the development of Windows applications. It also uses the ITextSharp library, which is an open-source library used for generating and manipulating PDF documents. To store the data generated by the app, I decided to use an SQLite database. SQLite is a lightweight, open-source database that is widely used in mobile and desktop applications. It is a self-contained, serverless database that requires minimal setup and administration, making it an ideal choice for small to medium-sized applications.

Overall, the app I developed is an excellent tool for researchers, students, and anyone who works with electronic text documents. It streamlines the process of studying, ranking and analyzing the frequency of words, saving users time and energy. It is written using modern programming languages and adheres to best coding practices, ensuring it is easy to maintain and extend.

Download from GitHub: DoshStat
SOAP with ASP.NET Core

[ ASP .NET Core, SOAP ]

SOAP (Simple Object Access Protocol) is a messaging protocol used in web services to exchange data between applications. In this article, we will explore the use of a connected SOAP service in a software development project. We will examine a sample app that uses a SOAP service to register a new customer and then sign in a user.

The code is written in C# and consists of two controllers: RegisterController and SignInController. These controllers. Each controller has corresponding views to register and sign in.

Before consuming the ICUTechService SOAP service it first must be represented by classes in our code, VS has a convenient way to scaffold those for us. Here are the steps:

  1. Right-click on the project in Solution Explorer, and select “Add” -> “Connected Service”.
  2. In the “Add Connected Service” dialog box, select “Microsoft WCF Web Service Reference Provider” and click on “Configure”.
  3. In the “Configure WCF Web Service Reference” dialog box, enter the URL of the ICUTechService WSDL file in the “Service URL” field and click on “Go”. This will load the WSDL and generate a preview of the service reference.
  4. In the “Configure WCF Web Service Reference” dialog box, you can specify the namespace for the service reference and the name of the service reference. You can also choose to enable or disable “Reuse types in referenced assemblies”.
  5. Click on “OK” to generate the service reference.

After that the wizard will create for us the ICUTechServiceReference class, which in turn has ICUTechClient() method, by calling that method we aquire access to the public methods of the service, the rest is easy:

  public class RegisterController : Controller
    {
        [HttpPost]
        public async Task<IActionResult> Index(string email, string password, string firstName, string lastName, string mobile)
        {
            ViewBag.IsDeveloperMode = true;
         
            var client = new ICUTechClient();
            var rawResponse = await client.RegisterNewCustomerAsync(email, password, firstName, lastName, mobile, 0, 0, "");
            ViewBag.ResponseData = JsonConvert.DeserializeObject(rawResponse.@return);

            return View();
        }
        public IActionResult Index()
        {
            return View();
        }
    }

It has two methods, Index and Index(HttpPost). The Index method returns a view for displaying the registration form to the user. The Index(HttpPost) method is called when the user submits the registration form. The method creates an instance of the ICUTechClient class and calls the RegisterNewCustomerAsync method to register a new customer with the ICUTechServiceReference service. The method then deserializes the raw response from the service using the Newtonsoft.Json library and sets the ViewBag.ResponseData property with the deserialized data.

public class SignInController : Controller
{
    [HttpPost]
    public async Task<IActionResult> Index(string username, string password)
    {
        ViewBag.IsDeveloperMode = false;

        var client = new ICUTechServiceReference.ICUTechClient();
        var rawResponse = await client.LoginAsync(username, password, "");
        ViewBag.ResponseData = JsonConvert.DeserializeObject(rawResponse.@return);
        
        return View();
    }
    public IActionResult Index()
    {
        return View();
    }
}

The SignInController class is similar to the RegisterController class, but instead of registering a new customer, it signs in an existing user. The class has two methods, Index and Index(HttpPost). The Index method returns a view for displaying the sign-in form to the user. The Index(HttpPost) method is called when the user submits the sign-in form. The method creates an instance of the ICUTechClient class and calls the LoginAsync method to sign in the user with the ICUTechServiceReference service. The method then deserializes the raw response from the service using the Newtonsoft.Json library and sets the ViewBag.ResponseData property with the deserialized data.

Considering the simplicity of our business logic, this is basically it, add an HTML wrapper and you are good to go! Using SOAP services can be a powerful tool in software development, allowing you to easily exchange data between applications. With a little bit of knowledge and some basic programming skills, you can leverage the power of SOAP to build robust and scalable applications that meet the needs of your users.

Check out the complete code in my GitHub repo:
https://github.com/movsar/mk-task

Geo-information system with AngularJS

[ PHP, JS, AngularJS, MySQL, Yandex API, Wialon SDK ]

As a software developer, one of my past projects was building a geo-information system in 2016. Using AngularJS, MySQL, PHP, HTML & CSS, and Bootstrap, I developed a robust application that offers a range of features to help companies track and manage their assets efficiently.

One of the most interesting features of the application is its advanced security. To protect the JavaScript code, PHP wrappers were used, ensuring that the code is tamper-proof and cannot be manipulated by malicious users. The application also has an authorization flow that requires users to authenticate before they can access the system, thus preventing unauthorized access to sensitive data. The access management system in the application is another noteworthy feature. With this system, administrators can assign roles to users and set object-level permissions. This ensures that users only have access to the information they are authorized to view or modify. Additionally, the system provides an audit trail of all user activities, making it easy to track changes and detect any unauthorized access attempts.

The core functionality of the application is the ability to build different types of objects with full CRUD support, which can be saved using a geo-coordinate system. This feature makes it easy for users to add and manage objects in a geo-environment. Objects can be plotted on a map using the system’s intuitive interface, which makes it easy to locate objects visually. This feature is useful for companies that need to manage large amounts of objects, such as pipelines, power grids, or other types of infrastructure.

Users can filter objects by type, organization, and other criteria, and then generate custom CSV reports based on their selected filters. This feature is useful for extracting insights from the data and making informed decisions. The geo-information system is a reliable and efficient solution for companies looking to track and manage their assets in a geo-environment. Its advanced security features, access management system, object management, and custom report generation make it a valuable tool for businesses in a range of industries.

Chechen Language Dictionary

[ Java, Android SDK, PHP, MySQL, Realm, JS, jQuery ]

The android app is a unique platform that brings together the Chechen community and serves as a hub for Chechen language. Available for download on the Google Play Store and online at https://nohchiyn-mott.com, the app is designed to cater to the needs of the Chechen diaspora worldwide, providing a space to connect and engage with others who share the same heritage.

One of the key features of the app is its interactivity, which enables users to add, edit, and rate the dictionary’s entries. This allows for a dynamic and up-to-date dictionary, as new words and definitions can be added as they are created. Moreover, users can rate each entry, which helps to identify the most accurate and widely accepted definitions. The app also provides a change history feature, which allows users to see how the definitions have evolved over time.

Written in Java, the app has rich functionality to filter entries, making it easy for users to find the words they need. The app uses an offline-first approach with a robust Realm database, which means that the app can be used even without an internet connection. However, the app synchronizes with a remote MySQL database, which ensures that the app stays up-to-date with the latest changes and additions. The app consists of an Android app written in Java and PHP files that serve as the backend for remote database operations.

One of the most significant aspects of the app is that it is community-driven. Users can register and participate in building and maintaining the dictionary, ensuring that the app remains a useful and relevant resource for the Chechen language community. The app’s design and functionality reflect the importance of community participation in language preservation efforts.

In conclusion, the Chechen Language Dictionary app is a fantastic example of how technology can be used to preserve and promote endangered languages. The app’s interactive features, robust database, and community-driven approach make it a valuable resource for the Chechen language community. As technology continues to advance, it is exciting to see how apps like this can help to protect and promote languages that are at risk of disappearing.

Download for Android: Chechen Language Dictionary
Online version: https://nohchiyn-mott.com

Noxçiyn Doşam

[ .NET, C#, WinForms, RegEx ]

As I continue posting my past projects, here is one from my university years. It is a C# WinForms dictionary application that is designed to translate words and phrases from Russian to Chechen language. The application is based on the .NET Framework and uses the WinForms technology for creating a graphical user interface (GUI).

Overview of the Application

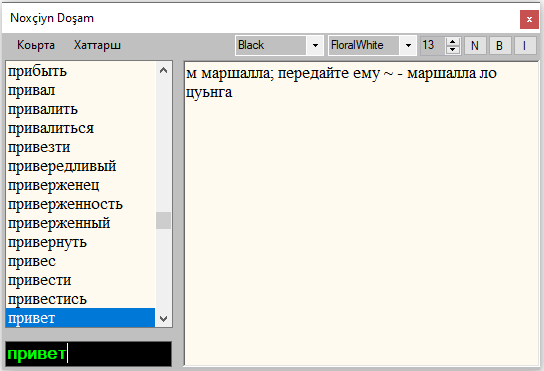
The C# WinForms dictionary application is called “Noxçiyn Doşam”, which translates to “Chechen Dictionary” in English. The application is designed to be easy to use and intuitive, with a simple and clean user interface that allows users to search for words and phrases in the Russian language and get their translations in the Chechen language.

The main window of the application consists of a search bar, a list box that displays the search results, and a label that shows the description of the selected word or phrase. Users can type in a word or phrase in the search bar and press Enter to search for it. The search results are displayed in the list box, with the matching words or phrases highlighted in yellow. Users can click on a word or phrase in the list box to select it and view its description in the label below. The application also includes a menu bar that provides additional functionality, such as the ability to exit the application, view the application version and copyright information, and change the font size and color of the text in the label and list box.

Code Structure and Design Patterns

The C# WinForms dictionary application is written in C# and uses the Visual Studio development environment for creating the GUI and writing the code. The code is organized into classes and methods that implement the various features and functionality of the application.

The main class of the application is called frmMain, which is a subclass of the Form class provided by WinForms. This class contains all the code that defines the behavior and appearance of the main window of the application. It also contains event handlers for responding to user actions, such as clicking on a menu item or selecting a word or phrase in the list box. The frmMain class uses several other classes and methods to implement the various features of the application, such as loading the dictionary data from a file, searching for words and phrases in the dictionary, and displaying the search results in the list box.

One of the key design patterns used in the application is the Model-View-Controller (MVC) pattern, which separates the application logic (the Model) from the user interface (the View) and the user input (the Controller). The Model consists of the dictionary data and the methods that operate on it, while the View consists of the GUI elements that display the data to the user. The Controller consists of the event handlers that respond to user input and update the Model and the View accordingly.

Another design pattern used in the application is the Singleton pattern, which ensures that there is only one instance of a particular class throughout the lifetime of the application. This pattern is used to implement the frmMain class as a Singleton, which ensures that there is only one main window of the application and prevents multiple instances from being created accidentally.

Download: Nohchiyn Dosham

Currency Converter

[ Salesforce, JS, Jest, Apex, HTML, CSS, Unit Tests ]


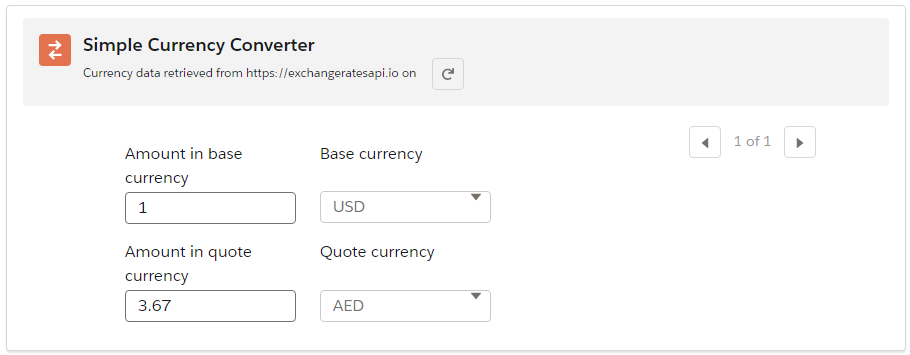
This is a project that was assigned to me when I tried to apply to a job. It’s a currency converter that can be used in both Salesforce Cloud and Experience Cloud web apps. It uses a public API to retrieve the rate, consists of LWC components, and an Apex backend. With this tool, users can easily convert currencies within Salesforce, saving them time and hassle.

The currency converter is made of several LWC components that are built with custom CSS styles. This not only gives the tool a professional look, but it also makes it easy for users to navigate and understand. The components are also designed to be responsive, meaning that they look great on any device. Behind the scenes, the currency converter is powered by an Apex backend and throughout the project I tried to keep everything consistent with SOLID principles. This ensures that all of the data is secure, testable and that the tool can handle large amounts of traffic. The backend retrieves currency rates and information from a public API, meaning that the data is always up-to-date and accurate. Here’s how the rates are calculated:

import Id from '@salesforce/user/Id';

const Utils = {
    gbpRates: [],
    calculateRates: function (baseCurrency) {
        if (!baseCurrency){
            console.error('calculateRates: base currency is empty');
            return;
        }
        let ratesForNewBaseCurrency = [];
        for (let i = 0; i < this.gbpRates.length; i++) {
            let newBaseRateInGbp = this.gbpRates.find(rate => rate.code === baseCurrency);
            let newRate = {};
            newRate.code = this.gbpRates[i].code;
            newRate.value = this.gbpRates[i].value / newBaseRateInGbp.value;
            newRate.order = LocalSettings.getCurrencyOrder(newRate.code);
            ratesForNewBaseCurrency.push(newRate);
        }

        // Sort by usage frequency
        ratesForNewBaseCurrency = ratesForNewBaseCurrency.sort((a, b) => (a.order > b.order) ? -1 : ((a.order < b.order) ? 1 : 0));
        
        return ratesForNewBaseCurrency;
    },
    ...
}
...

One of the key design principles that I followed when creating the currency converter is SOLID. This stands for Single Responsibility, Open-Closed, Liskov Substitution, Interface Segregation, and Dependency Inversion. These principles help ensure that the code is easy to understand, maintain, and expand over time.

To ensure that everything was working as intended, I also wrote unit tests using Jest. These tests cover all of the key functionality of the currency converter, from retrieving currency rates to converting currencies. By writing these tests, I was able to catch and fix any issues early on, ensuring that the tool was ready for use.

This is how one of the test files look like:

import { createElement } from 'lwc';
import CurrencyConverter from 'c/CurrencyConverter';
const mockData = require('./mockData.json');
const flushPromises = () => new Promise(setImmediate);
import fetchMock from "jest-fetch-mock";


describe('c-currency-converter', () => {
    afterEach(() => {
        // The jsdom instance is shared across test cases in a single file so reset the DOM
        while (document.body.firstChild) {
            document.body.removeChild(document.body.firstChild);
        }
    });

    it('retrieve data test', async () => {
        const element = createElement('c-currency-converter', {
            is: CurrencyConverter
        });
        element.ratesPerPage = 2;

        fetchMock.enableMocks();
        fetch.mockResponseOnce(JSON.stringify({ rates: { CAD: 1.42 } }));

        document.body.appendChild(element);
        await flushPromises();

        const subheaderElement = element.shadowRoot.querySelector('[data-id=subheader]');
        const subheader = subheaderElement.textContent.split('on ')[1].replace(/\:\d+$/, '');
        const dateTimeNow = (new Date()).toLocaleString().replace(/\:\d+$/, '');

        // Check last update date time, as retrieveData is mocked, these should be the same
        expect(subheader).toEqual(dateTimeNow);
    });

    it('handlers test', async () => {
        const element = createElement('c-currency-converter', {
            is: CurrencyConverter
        });
        element.ratesPerPage = 2;

        fetchMock.enableMocks();
        fetch.mockResponseOnce(JSON.stringify({ rates: { CAD: 1.42, GBP: 1, USD: 2 } }));

        document.body.appendChild(element);
        await flushPromises();

        const currencyConverterCalc = element.shadowRoot.querySelector('c-currency-converter-calc');
        currencyConverterCalc.dispatchEvent(new CustomEvent("basechange", {detail: 'GBP'}));
        await flushPromises();

        currencyConverterCalc.dispatchEvent(new CustomEvent("quotechange", {detail: 'GBP'}));
        await flushPromises();

        const currencyConverterList = element.shadowRoot.querySelector('c-currency-converter-list');
        currencyConverterList.dispatchEvent(new CustomEvent("nextpage"));
        await flushPromises();

        currencyConverterList.dispatchEvent(new CustomEvent("previouspage"));
        await flushPromises();

    });
});

The first test case checks the “retrieve data” functionality, where the component fetches the latest currency exchange rates from an API and displays them on the UI. This test case mocks the API response and checks if the component is displaying the last update date and time correctly.

The second test case checks the event handlers of the component, where the user interacts with the UI to change the base and quote currencies and to navigate between pages of the currency rate list. This test case dispatches CustomEvents to simulate user interactions and checks if the component responds to these events correctly.

The test suite also contains an afterEach hook that resets the DOM after each test case.

Check out the complete code:
GitHub: https://github.com/movsar/kassignment

Alternative Chechen Alphabet Converter

[ .NET, WinForms ]

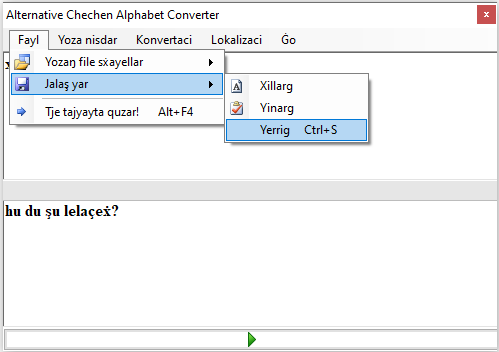
Text conversion is a common task that many people encounter in their daily lives. Sometimes, we need to convert text from one format to another, such as from Cyrillic to Latin script. This can be particularly important in certain contexts, such as when dealing with languages that use different writing systems. In this blog post, I will introduce an application that performs two-directional text conversion between Cyrillic-based Chechen and Latin-based Chechen. This application has a rich user interface that makes it easy and intuitive to use.

The first thing you’ll notice when you open the application is the clean and modern design of the user interface. The layout is straightforward and easy to understand, with a large input area for entering text and a button to initiate the conversion process. The application supports both Cyrillic and Latin-based input, and the user can select the desired input mode from a drop-down menu. Additionally, there is an option to copy the converted text to the clipboard or save it as a file.

The conversion process itself is fast and accurate. The application uses a custom algorithm to perform the conversion, which ensures that the resulting text is accurate and grammatically correct. The algorithm also supports advanced features such as case conversion, diacritic conversion, and automatic spelling correction.

Another notable feature of this application is its support for two-directional text conversion. This means that users can convert text from Cyrillic to Latin-based script or from Latin to Cyrillic-based script, depending on their needs. This feature is particularly useful for users who need to communicate with others who use a different writing system.

In conclusion, this application is a powerful and intuitive tool for performing two-directional text conversion between Cyrillic-based Chechen and Latin-based Chechen. Its rich user interface makes it easy to use, while its advanced conversion algorithm ensures fast and accurate results. Whether you’re communicating with friends and family or working on a professional project, this application is an essential tool for anyone who needs to convert text between different writing systems.

GitHub: https://github.com/movsar/cyrtolat

XScraper – A parser for autotrader.co.uk

[ JS, PHP, Scraping ]

Web scraping is a technique used for extracting large amounts of data from websites, which can then be used for various purposes such as market research, data analysis, or data-driven decision-making. In this article, we will walk through the front-end code for a PHP web scraper that was built to scrape data from autotrader.co.uk, a European car dealer website.

Before diving into the code, it is important to note that this code is presented only for a presentation, and it is not meant to be used ‘as is’. Additionally, the scraper supports proxy servers and is basically bulletproof because of the techniques used in code to detect any failures and fix them during the execution. Also, it supports multiple instances, and the UI has controls to start scraping at different locations which comes handy quite often.

The front-end code consists of an HTML file, ‘index.html,’ and a JavaScript file, ‘app.js.’ The HTML file contains the basic structure of the user interface, which includes input fields for the make index, model index, and page index. These input fields allow the user to specify the range of data they want to scrape. Additionally, the HTML file contains a ‘Start’ button, which triggers the scraping process. The JavaScript file, on the other hand, contains the code that actually scrapes the data.

To begin, the JavaScript file starts by setting some constants for delay times between scraping requests. These constants, DELAY_CARS, DELAY_IDS, and DELAY_TRY_AGAIN, are used to ensure that the scraping process runs smoothly without overloading the website’s servers.

Next, the script defines a sleep function that is used to pause the execution of the script for a specified amount of time. This function is useful for ensuring that the scraper does not send too many requests to the website at once, which could lead to server overload or IP blocking. The rnd function generates a random number between two specified values, which is used to randomize the delay times between scraping requests. This randomization helps to further ensure that the website’s servers are not overloaded and that the scraper is not detected and blocked. The request function is used to send HTTP requests to the website’s servers. This function takes a payload object as an argument, which contains the URL to be scraped and any other necessary parameters. The function returns a Promise object, which resolves to the server’s response.

Here’s the main backend code in PHP:


function scrapeCarInfo($id, $proxy)
{
    $GLOBALS['db']->where("carId", $id);
    $res = $GLOBALS['db']->getOne("autoradar_cars");

    if ($res !== null) {
        return (json_encode(["id" => $id,  "index" => $res['id'], "notes" => 'already there']));
    }

    if (strlen($id) > 20) {
        // new car

        $response = json_decode(request(array('url' => 'https://www.autotrader.co.uk/json/new-cars/derivative/get?id=f0d8e2aea02747a998f94f28c981a0eb', 'proxy' => $proxy)));
        if (property_exists($response, 'ERR_CODE')) return json_encode($response);
        $ci = ($response);

        usleep(250000);

        $response = json_decode(request(array('url' => 'https://www.autotrader.co.uk/json/dealers/search/by-derivative?derivativeId=f0d8e2aea02747a998f94f28c981a0eb&postcode=e161xl', 'proxy' => $proxy)));
        if (!is_array($response)) return $response;
        $di = ($response);

        $title = $ci->make . " " . $ci->name;
        $phone = $di[0]->review->dealer->phoneNo1;
        $price = $ci->price;
        $href = 'https://www.autotrader.co.uk' . $ci->uri;
    } else {
        //  used car
        $response = json_decode(request(array('url' => ('https://www.autotrader.co.uk/json/fpa/initial/' . $id), 'proxy' => $proxy)));
        if (property_exists($response, 'ERR_CODE')) return json_encode($response);

        $carInfo = ($response);

        $title = $carInfo->advert->title;
        $phone =  $carInfo->seller->primaryContactNumber;
        $price = $carInfo->advert->price;
        $href = 'https://www.autotrader.co.uk/classified/advert/' . $id;
    }

    // Save data
    $data = array(
        'carId' => $id,
        'title' => $title,
        'href' => $href,
        'phone' => $phone,
        'price' => $price
    );


    $insertedId = $GLOBALS['db']->insert('autoradar_cars', $data);
    $response = array("id" => $id,  "index" => $insertedId);

    return json_encode($response);
}

The updateUI function is used to update the user interface with information about the scraping progress. This function extracts information from the scraping process, such as the make index, model index, and page index, and displays it in the appropriate input fields. Finally, the script defines an array of proxy servers that are used to send the scraping requests. This array contains a list of IP addresses and port numbers, which are used to randomize the proxy server used for each request.

In conclusion, the PHP web scraper presented here is a simple yet effective tool for scraping data from autotrader.co.uk. While the code presented here is not meant to be used ‘as is’, it provides a solid foundation for building more complex scraping tools. With the right modifications and adjustments, this scraper can be used to extract a wide range of data from other websites as well.

GitHub: https://github.com/movsar/xscraper